Shopify · Set Aside
Setting up Set Aside
Set Aside: Pre-Orders & Holds is a free Shopify app by FlexiLay for selling things you don't have yet, and for making sure nothing ships before it's paid for. Mark a product as a pre-order with a release date, or give it a pay-by date, and the app does the rest: the storefront shows a pre-order button and the dates, every order that contains the product is tagged in Shopify and put on a fulfilment hold, and the hold comes off when the order is paid in full and the release date has arrived. If your store also runs FlexiLay Payments, a pay-by date becomes the end date of the customer's lay-by plan.
What's where
| Tab | What you do there |
|---|---|
| Overview | Today's numbers (releasable, overdue, on hold, released), sold-out products with stock on the way, the orders waiting on you, recent activity and the setup checklist. |
| Pre-Orders | Products customers can buy before release: status, release date, pay-by, campaign window, units pre-sold, stock and incoming stock. Add by product, collection or tag. |
| Deadlines | Products that must be paid for by a date (or held until paid), with the same tools. |
| Held & Released | Every order that contains one of your products: hold state, payment, dates, Release and Open order. Filters, search, sort and CSV export. |
| LayBy / Lay-A-Way | What FlexiLay Payments adds (lay-by at checkout with the pay-by date built in), with install and setup status. |
| Settings | Defaults for new products, Storefront Widgets (button, badge, messages, cart notice, LayBy line, live preview), Notifications, Advanced selectors. |
Install and open the app
Install Set Aside from its Shopify App Store listing and approve the permissions. The app reads and writes products and purchase options (that's how it makes a product a pre-order), reads and writes orders and fulfilment orders (tags and holds), and reads inventory (stock and incoming stock). It never touches payments.
On first open you land on the Overview with a setup checklist. There's no plan to approve and nothing to pay: Set Aside is free.
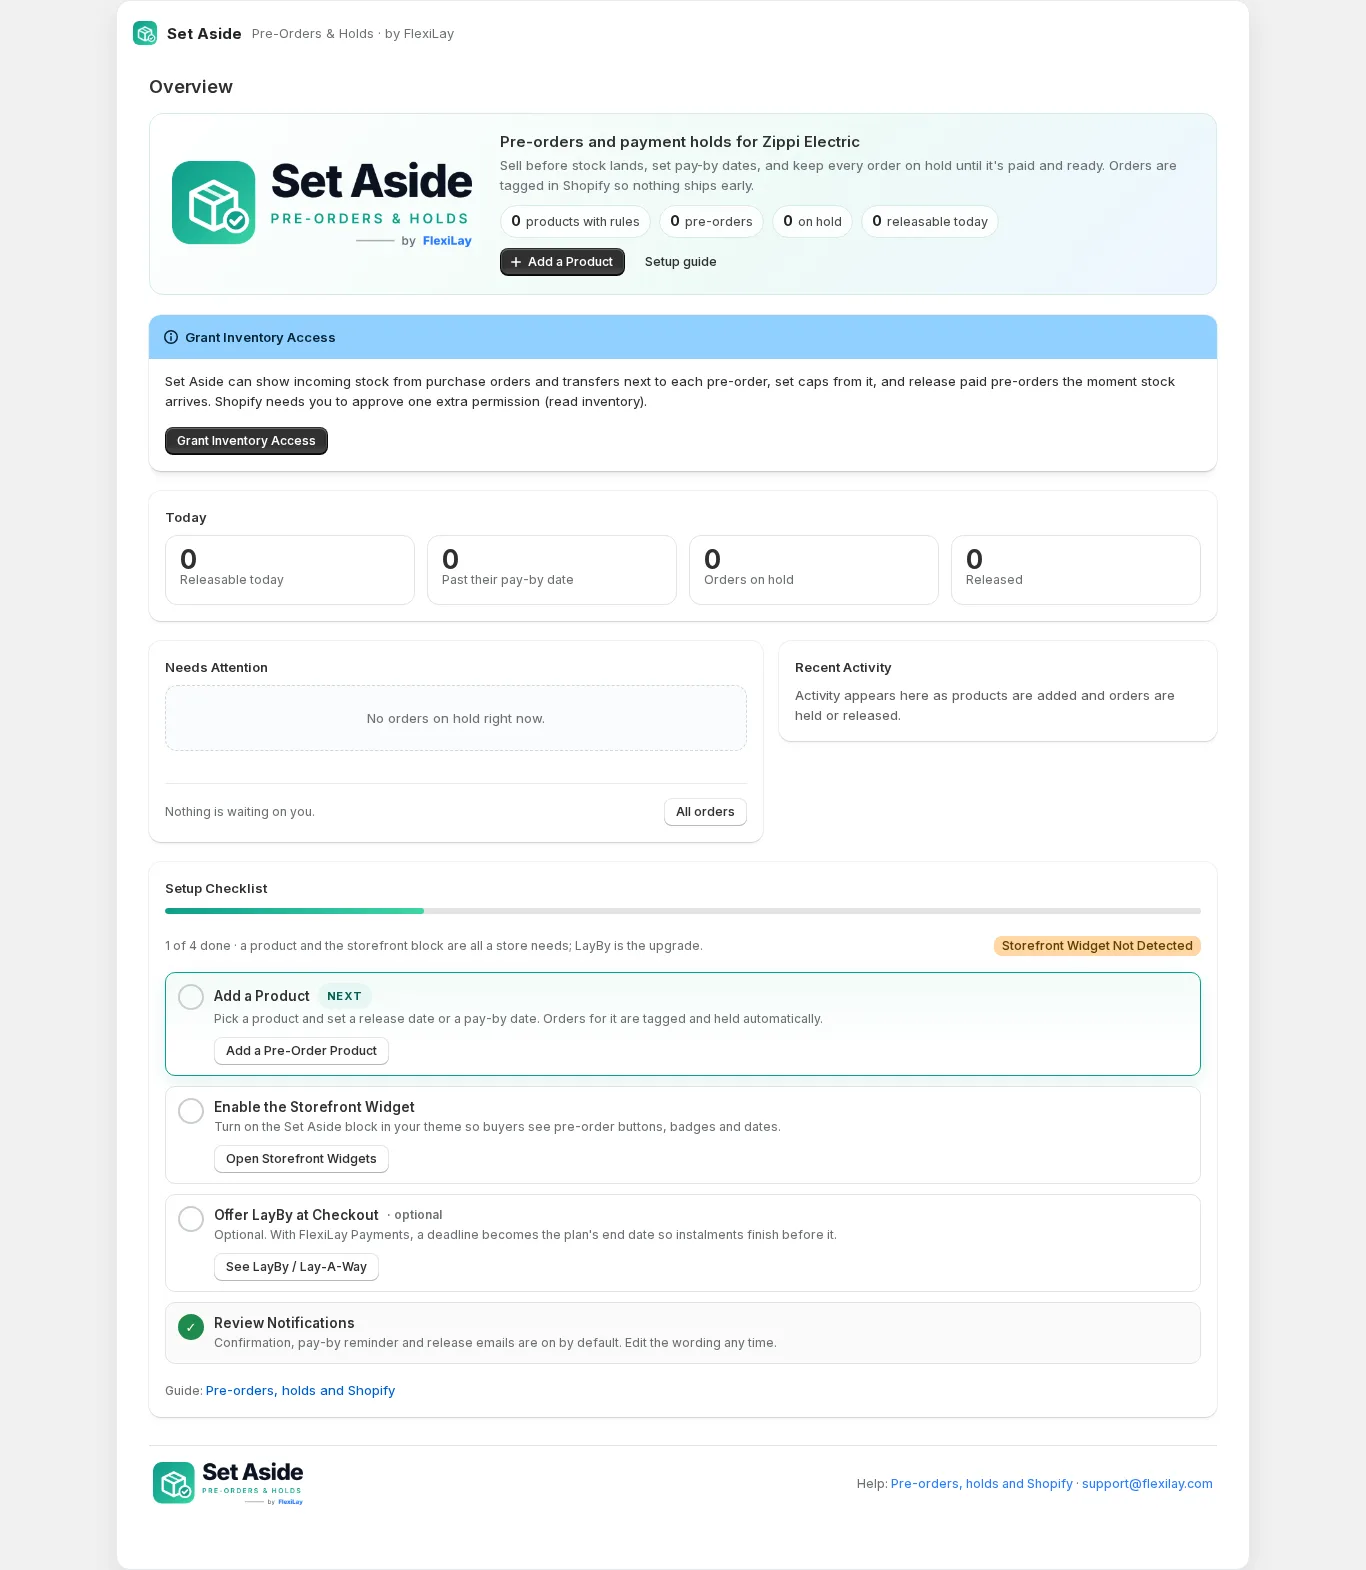
Grant Inventory Access banner? Stores that installed before incoming stock existed see it once. Click it, approve the extra permission, and the banner goes. Everything else works without it.
Add a pre-order product
Open Pre-Orders and click Add Pre-Order Product. Shopify's product picker opens; search and choose one product. Then:
- Release / Ship-By Date — when you expect to ship. Customers see “Ships from”.
- Payment Deadline — Paid by the Release Date is the default. Choose a fixed date, a number of days after the order, or no fixed deadline (the order is simply held until it's paid).
- Maximum LayBy Length — caps how long a FlexiLay plan can run for this product. Leave blank to use the store default from Settings.
- Button Text — replaces Add to Cart for this product (the default is set in Settings).
- Campaign Starts / Ends — optional. A pre-order starts now and ends on the release date unless you say otherwise.
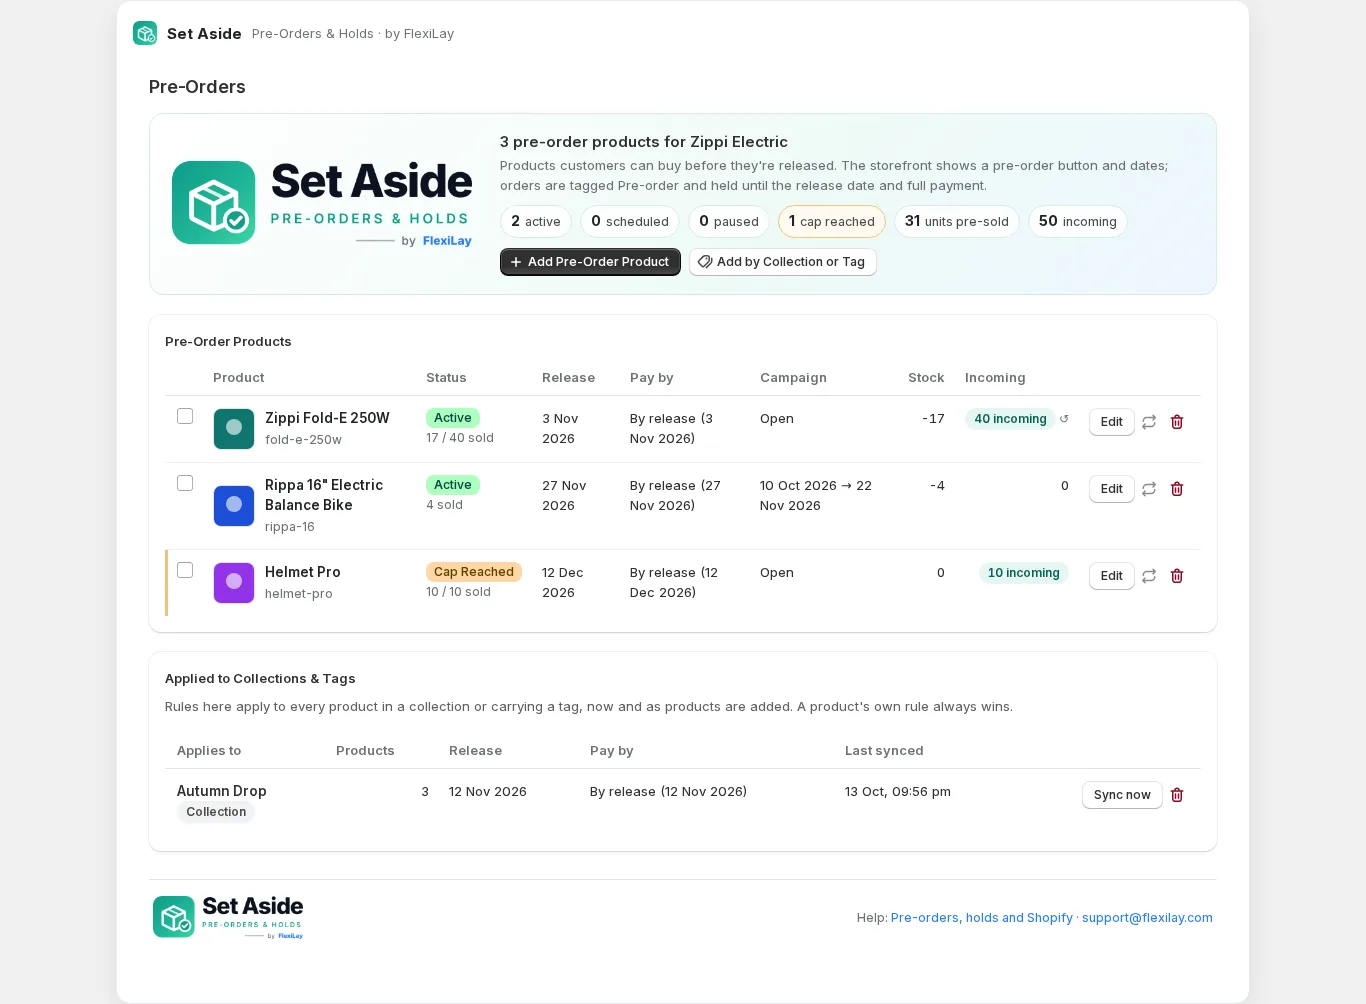
- Pre-Order Cap — stop taking pre-orders after this many units. The table shows “17 / 40 sold”. Cancelled orders give their units back.
- Keep Selling When Out of Stock — on by default for pre-orders, so customers can buy at zero stock.
- Release Paid Orders When Stock Arrives — see step 6.
What this changes on your product
Saving a pre-order rule changes the product in Shopify, and the app tells you so before you save:
- A hidden Pre-order selling plan is added, so Shopify labels the line “Pre-order” at checkout and schedules fulfilment for the release date.
- Shopify's Requires selling plan is switched on, which makes the product pre-order only until the release date.
- With Keep Selling ticked, every variant is set to continue selling when out of stock. Pre-orders reduce the available quantity, so a sold-out product goes negative: that number is how many units you owe.
Everything is put back the way it was when the rule ends, is paused or is removed, including each variant's original out-of-stock setting.
Already sold out with stock on the way? The Overview lists active products at zero stock with no rule yet, with their incoming units. Make Pre-Order opens the form with the product chosen, the cap set from what's on order and release-on-arrival ticked. You add the release date.
Statuses
- Active — in force now.
- Scheduled — the campaign hasn't started.
- Cap Reached — the pre-order cap is full; the storefront shows your Sold Out text.
- Ended — the campaign end date has passed.
- Released — the release date has passed; the product sells normally again.
- Paused — switched off by you (select rows and use Pause / Resume).
Moving a release date moves every held order for that product to the new date, and offers to send those customers the Shipping Delay email in one click.
Give a product a pay-by date
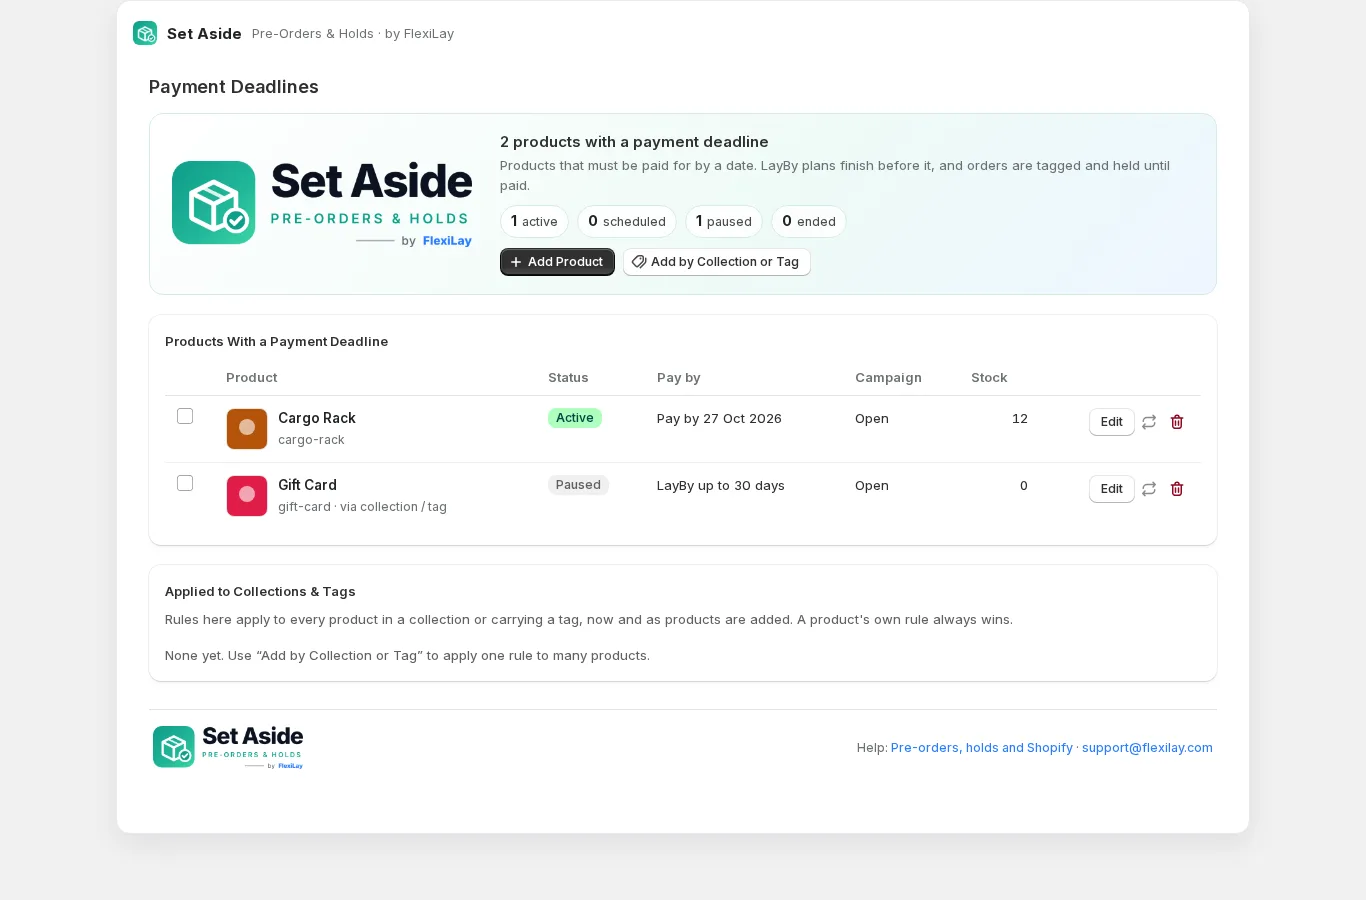
Open Deadlines and click Add Product. Leave This Is a Pre-Order Product unticked. Choose the deadline: a fixed date, a number of days after the order, or none at all, which means “hold until paid”. Orders for the product are tagged and held until they're paid in full, and released the moment they are.
With FlexiLay Payments on the store, the pay-by date also becomes the end date of the customer's lay-by plan: their instalments are compressed so the last one lands before it (a date that's already close means pay in full at checkout).
Apply one rule to a collection or a tag
On either tab, Add by Collection or Tag applies one rule to every product in a collection (chosen with Shopify's picker) or carrying a tag you type. The products appear in the table marked “via collection / tag”. Products added to the collection or tag later are picked up on Sync now and every night; products that leave it have their rule removed.
A product's own rule always wins over a collection or tag rule, so you can set a release date for a whole drop and still give one product its own.
Turn on the storefront widget
The widget is a theme app embed. Turn it on once: Online Store → Themes → Customize, open App embeds (the puzzle-piece icon), switch on Set Aside and Save. Load any product page once and the Overview's badge turns to Storefront Widget Active.
On a product with a rule, the widget:
- swaps the Add to Cart text for your pre-order button text (pre-orders only);
- adds the hidden selling-plan field, so themes without purchase-option UI can still add a pre-order to the cart;
- places the badge on the product image (or under the title), and on collection cards if you choose;
- shows the “ships from” and “pay by” messages below or above the button, or under the price;
- shows a notice in the cart when it contains a pre-order;
- shows the LayBy price line (“Or LayBy from $216 a week with FlexiLay”) on every product, once FlexiLay Payments is installed and ready.
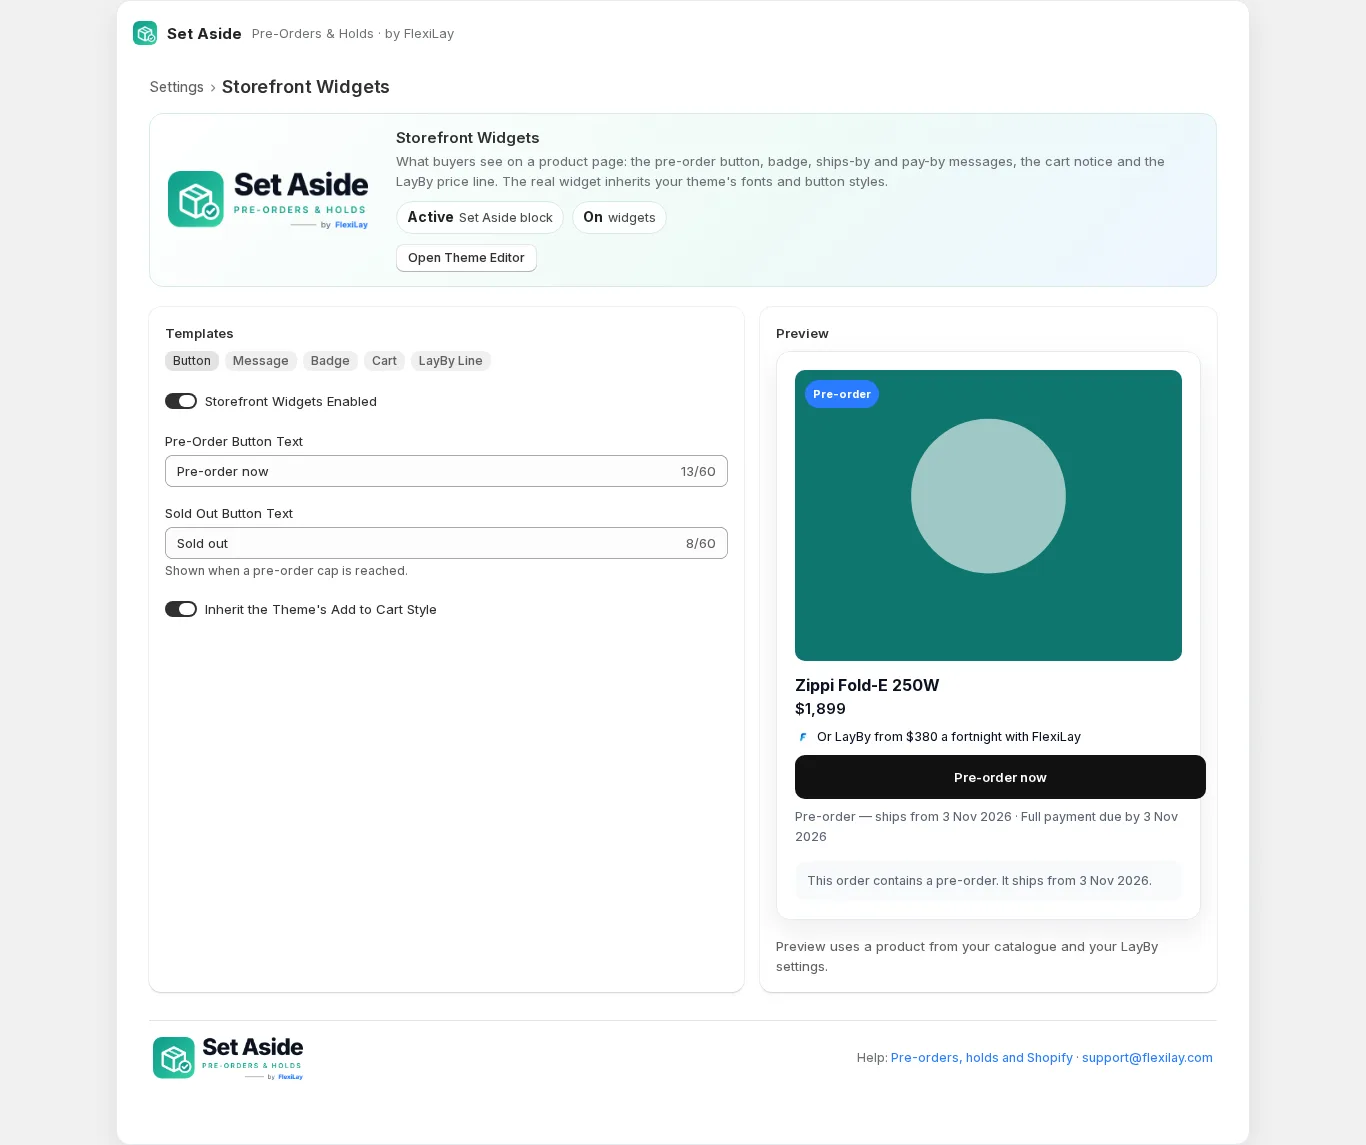
Wording, badge colours and positions live under Settings → Storefront Widgets, with a live
preview. Messages accept {release_date}, {payby_date} and {shop_name}; the
LayBy line accepts {label}, {instalment}, {frequency}, {deposit}
and {payments}. Changes reach the storefront within a minute.
Themes that hide the button
The widget finds the product form and Add to Cart button on its own in every current Shopify theme. If a
custom theme hides them, Settings → Advanced takes CSS selectors for the form, the button, the
price and the badge container. For themes that render their own buttons, the widget also sets
data-flexilay-preorder, data-release-date, data-payby-date and
data-layby-from on the product form and fires a flexilay:preorder event, so your
developer can draw whatever they like.
Incoming stock and purchase orders
When you create a purchase order or a transfer in Shopify and mark it as ordered, the units show as incoming on the product. Set Aside shows that number beside each pre-order (refreshed when you save or re-sync, nightly, and whenever Shopify's inventory changes), and uses it in two ways:
- Set Cap From Incoming in the rule editor copies the incoming units into the pre-order cap, so you sell exactly what's on order.
- Release Paid Orders When Stock Arrives: when the purchase order is received and the product's available stock comes back up to zero or above, every paid held order for it is released straight away, ahead of the release date. Unpaid orders stay held until they're paid. A partial delivery that leaves stock negative releases nothing.
Stock and incoming are summed across every variant and location. Untracked inventory never triggers a release.
How orders are tagged, held and released
The moment an order containing one of your products is placed, by any payment method, Set Aside:
- tags it
FlexiLay:Deadline,Pre-order(if any line is a pre-order),Pay-by YYYY-MM-DDandFlexiLay:OnHold, and writes the dates as order attributes; - puts a fulfilment hold on it (reason Awaiting payment until it's paid, otherwise Other with the release date in the note) so your team and any 3PL see it can't ship yet;
- emails the customer the pre-order confirmation (see step 9).
An order is released, the hold lifted and the tag changed to FlexiLay:Released, when it is
paid in full and the release date has arrived (or there is none). That happens automatically
within ten minutes of either condition being met, the day stock lands if you chose that, or when you press
Release in the app to ship early. If you'd rather paid pre-orders ship as soon as they're paid
without waiting for the date, turn off Hold Fully Paid Pre-Orders Until Their Release Date in Settings;
anything already paid is released at once.
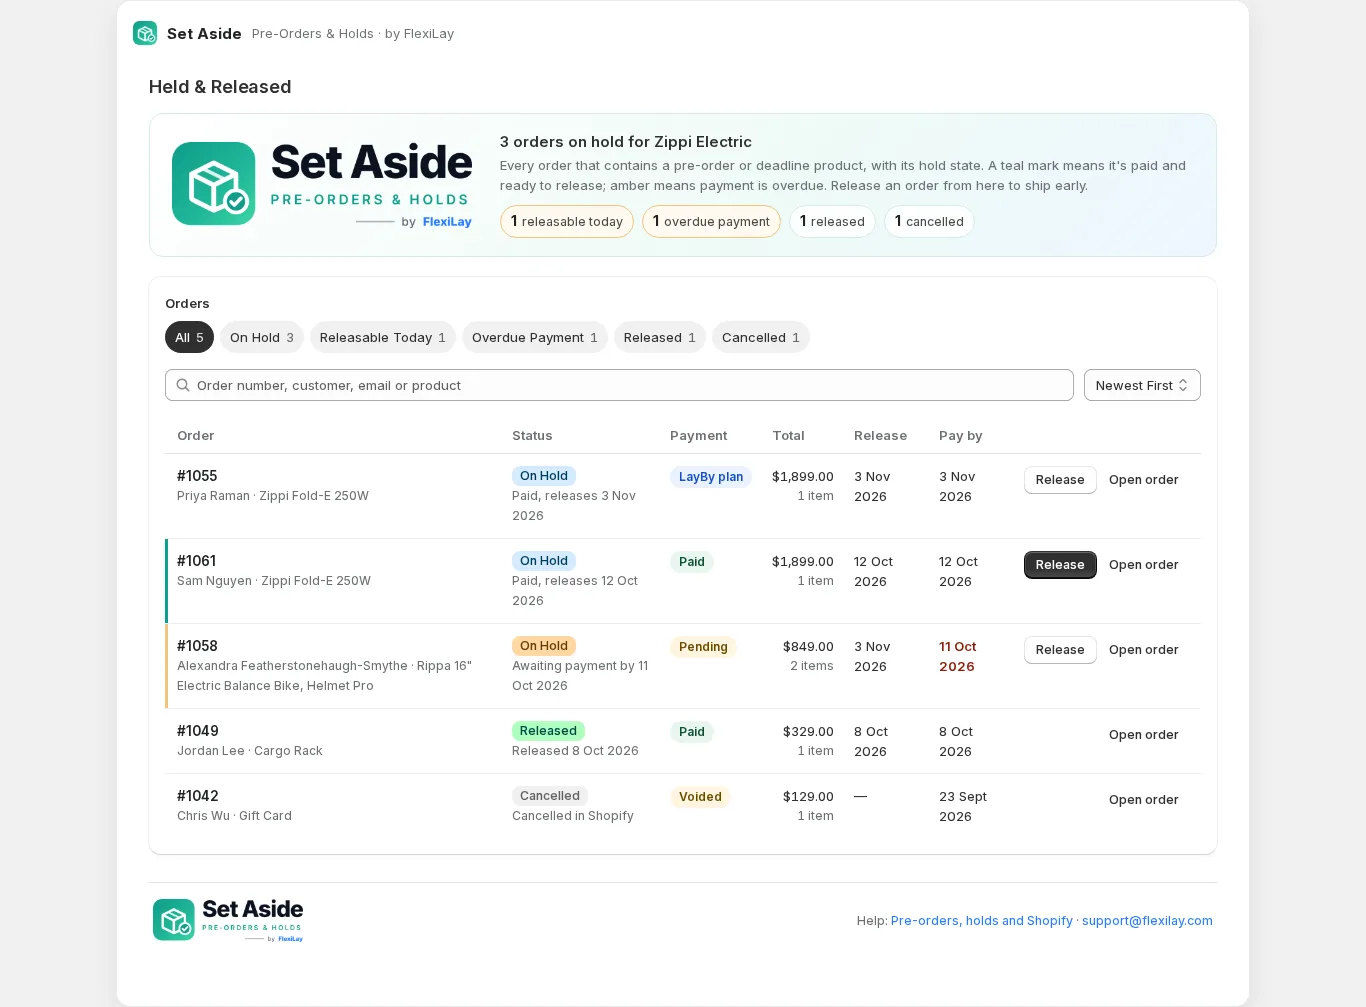
- An order cancelled in Shopify is marked cancelled here and gives its units back to the cap; the hold is left for you to deal with in Shopify.
- The CSV export carries the same columns as the table for whatever filter is showing.
- Orders paid by a FlexiLay lay-by are marked LayBy plan; they count as paid when the plan completes, and FlexiLay's own emails cover them.
Set Aside never changes an order's payment status. Shopify shows an order as paid when the payment provider says so; the hold and the tags are how “don't ship yet” is carried. Warehouses and 3PLs that respect Shopify fulfilment holds respect this.
Lay-by at checkout with FlexiLay Payments
Set Aside works on its own. Add FlexiLay Payments and customers can also choose Lay-By / Lay-A-Way at checkout: a deposit now, the balance in scheduled instalments into your own Stripe account, and the order held until the plan is paid in full. The LayBy / Lay-A-Way tab explains it with one of your own products, shows your setup status, and links to install, finish setup or open the FlexiLay dashboard.
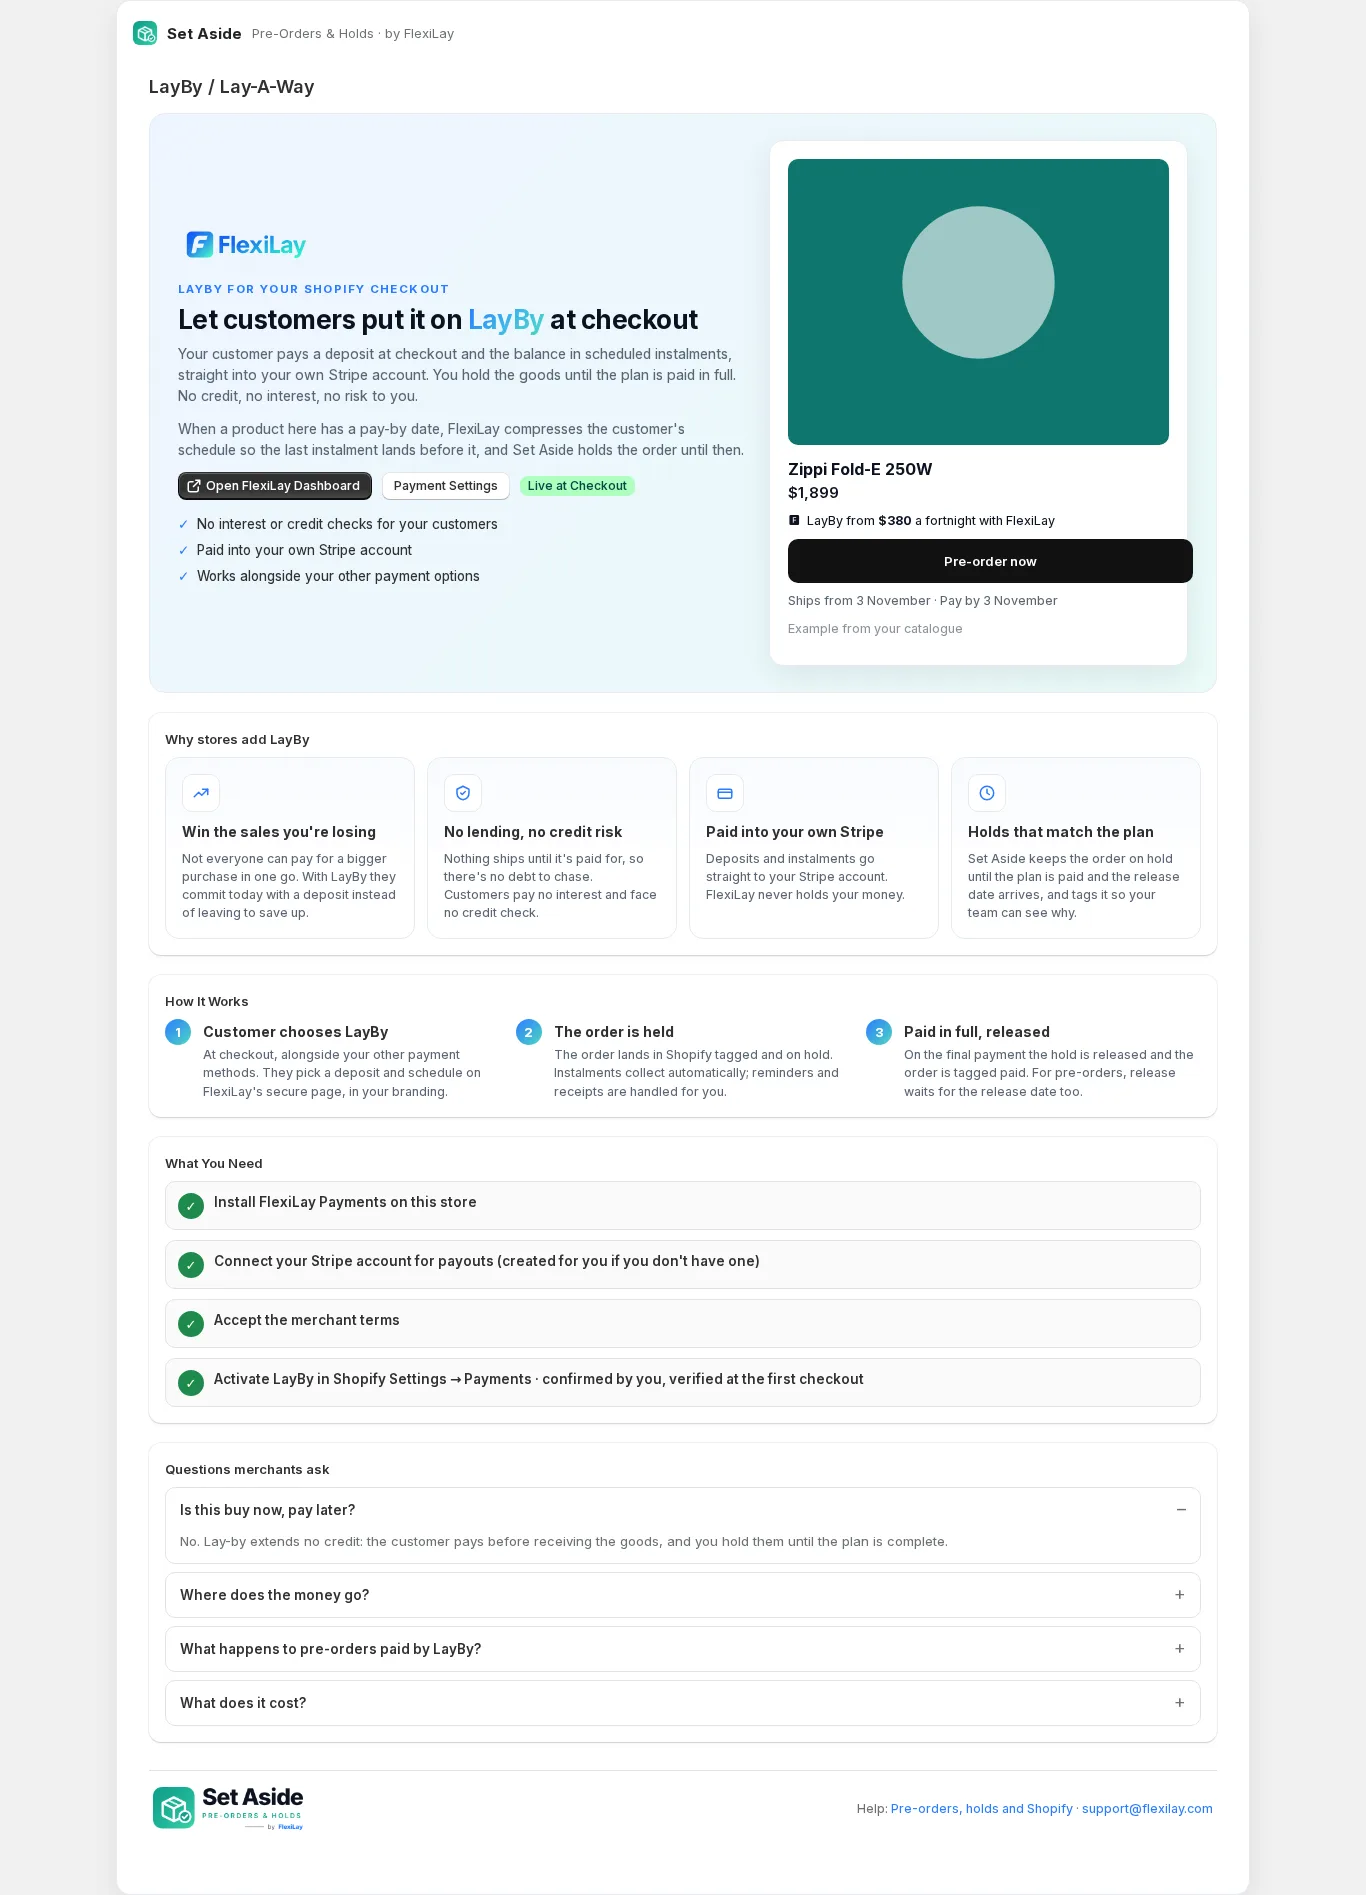
Together the two apps do what neither can alone:
- A product's pay-by date becomes the plan's end date, so instalments finish before it.
- A pre-order paid by lay-by is released only when the plan is complete and the release date has arrived.
- The storefront's LayBy price line uses your real schedule settings and, on a product with a deadline, the compressed schedule.
Shopify gives apps no way to see whether a payment method is switched on in Settings → Payments, so the last step of “What You Need” is confirmed by you with I've Already Activated It, and verified automatically at the first checkout.
Notifications
Four emails to buyers and one to you, under Settings → Notifications. Each has an editable
subject and message with variables ({order_name}, {customer_first_name},
{release_date}, {payby_date}, {products}, {total} and more),
a Live / Draft switch, and Send Test to Me.
- Pre-Order Confirmation — when an order with one of your products is placed.
- Pay-By Reminder — a set number of days before the deadline, to orders not yet paid in full, once.
- Release Notice — when the order is released for fulfilment.
- Shipping Delay — draft by default; sent when you move a release date and choose to tell customers.
- Daily Digest to you — orders ready to release, orders past their pay-by date, and pre-orders whose release date passed with no stock in.
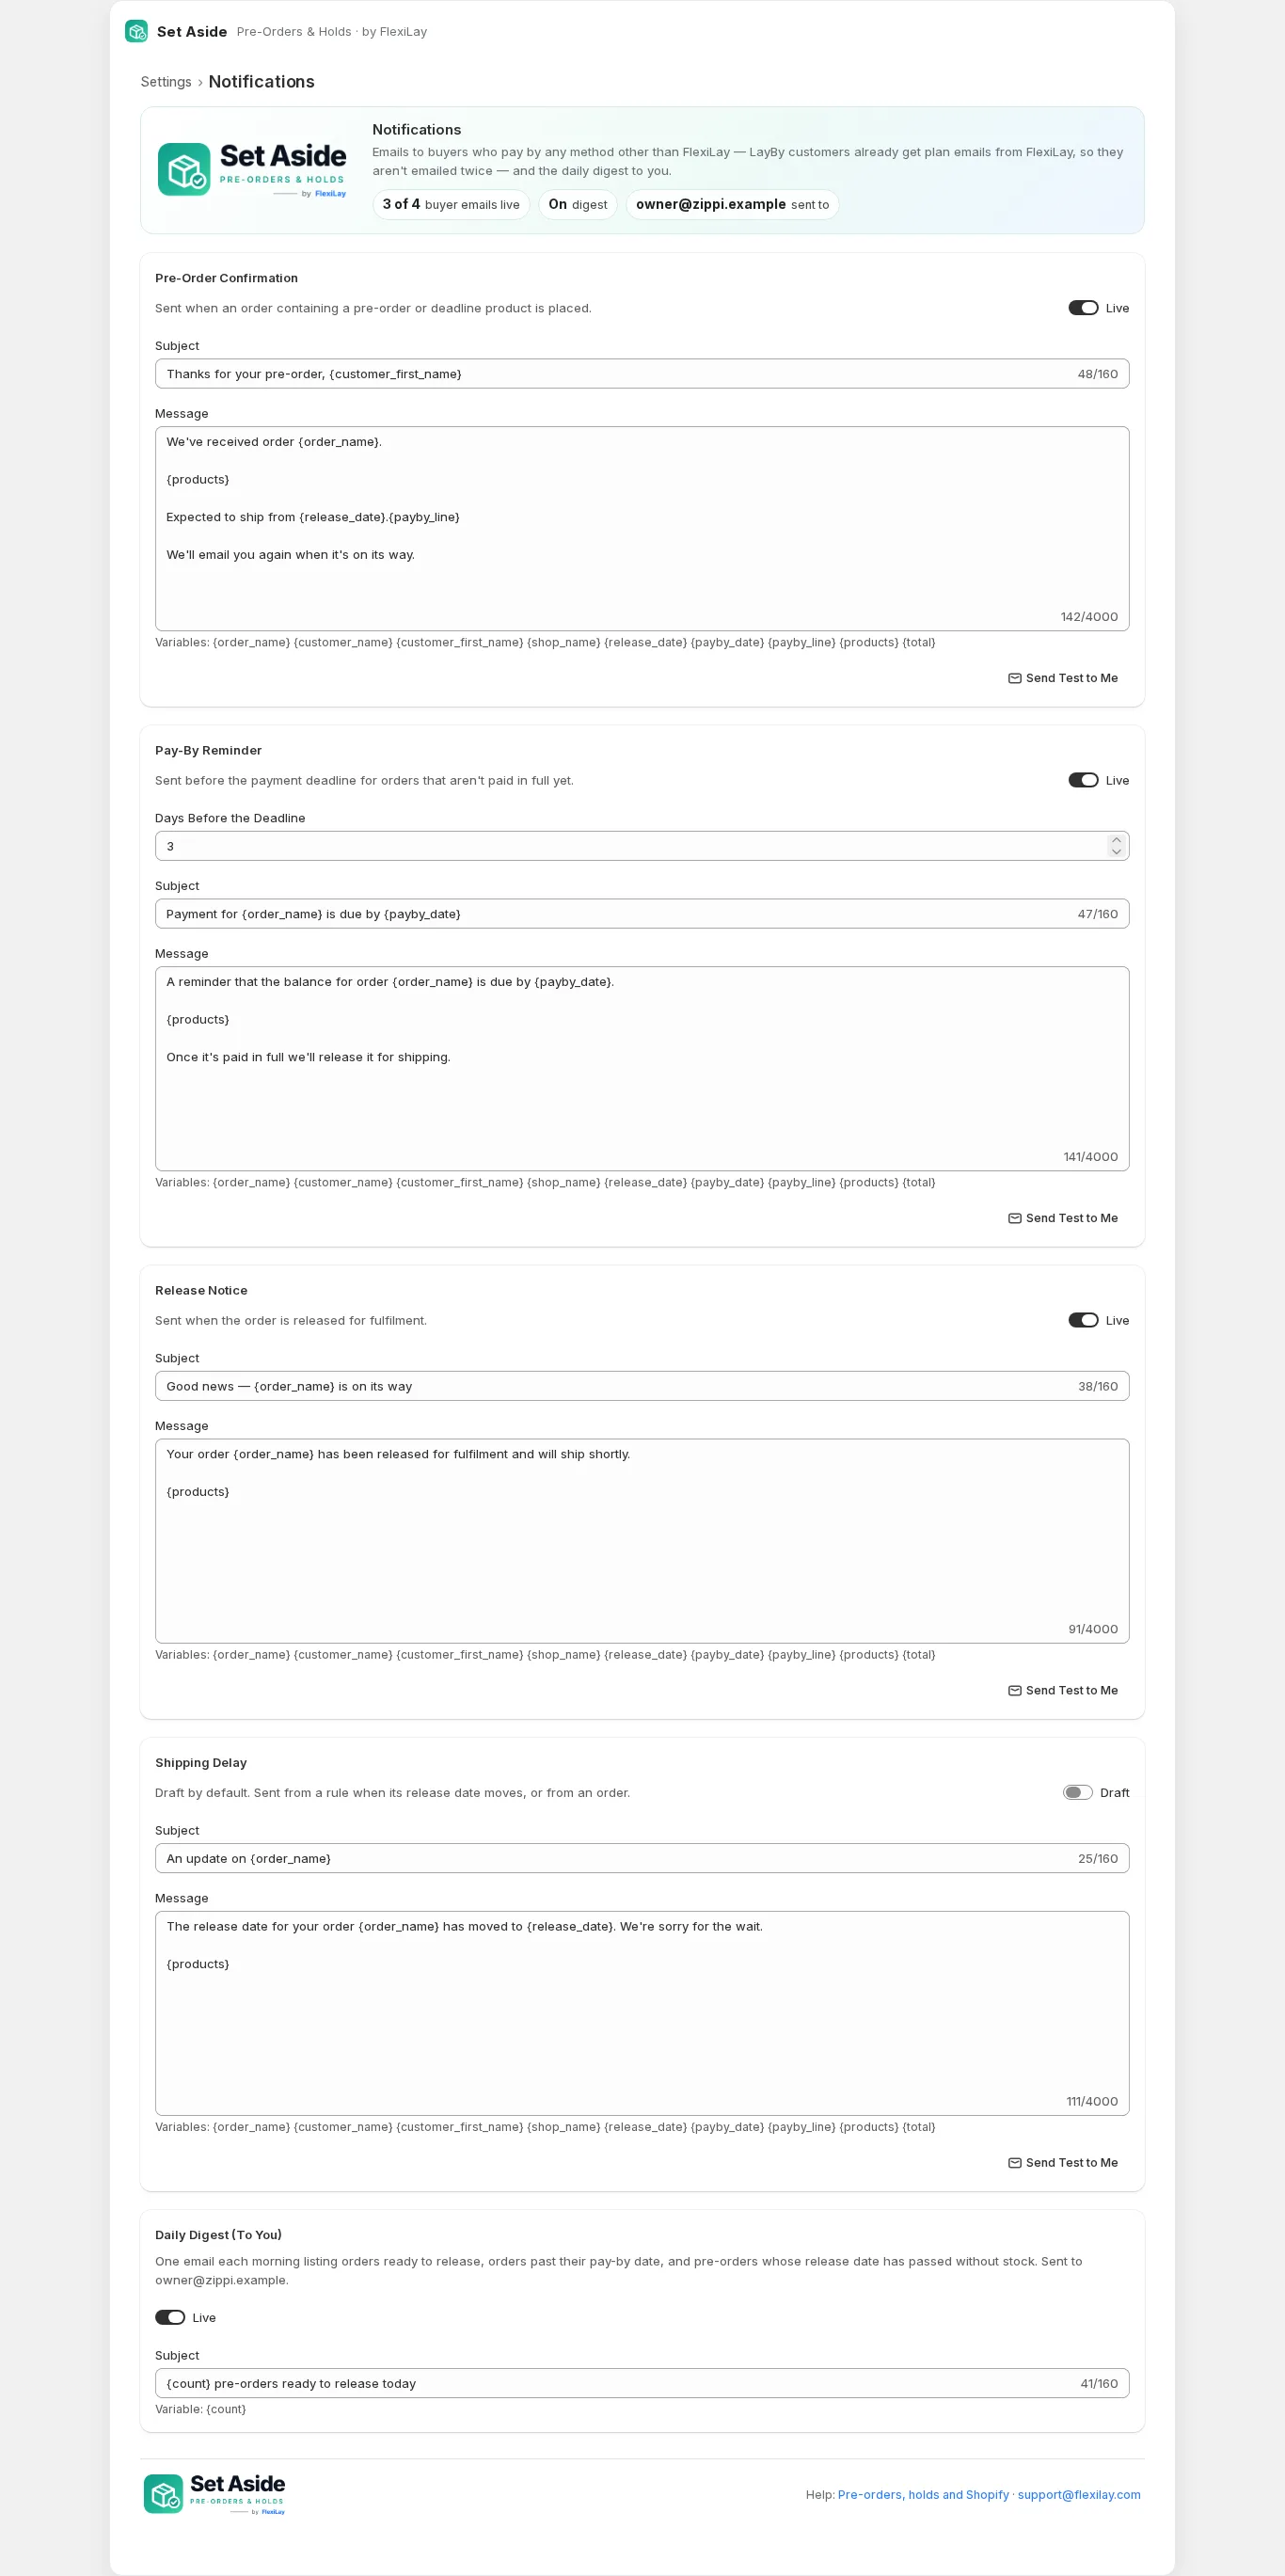
Customers paying by FlexiLay lay-by are not emailed by Set Aside. FlexiLay's own plan emails cover them, so nobody is emailed twice.
Settings
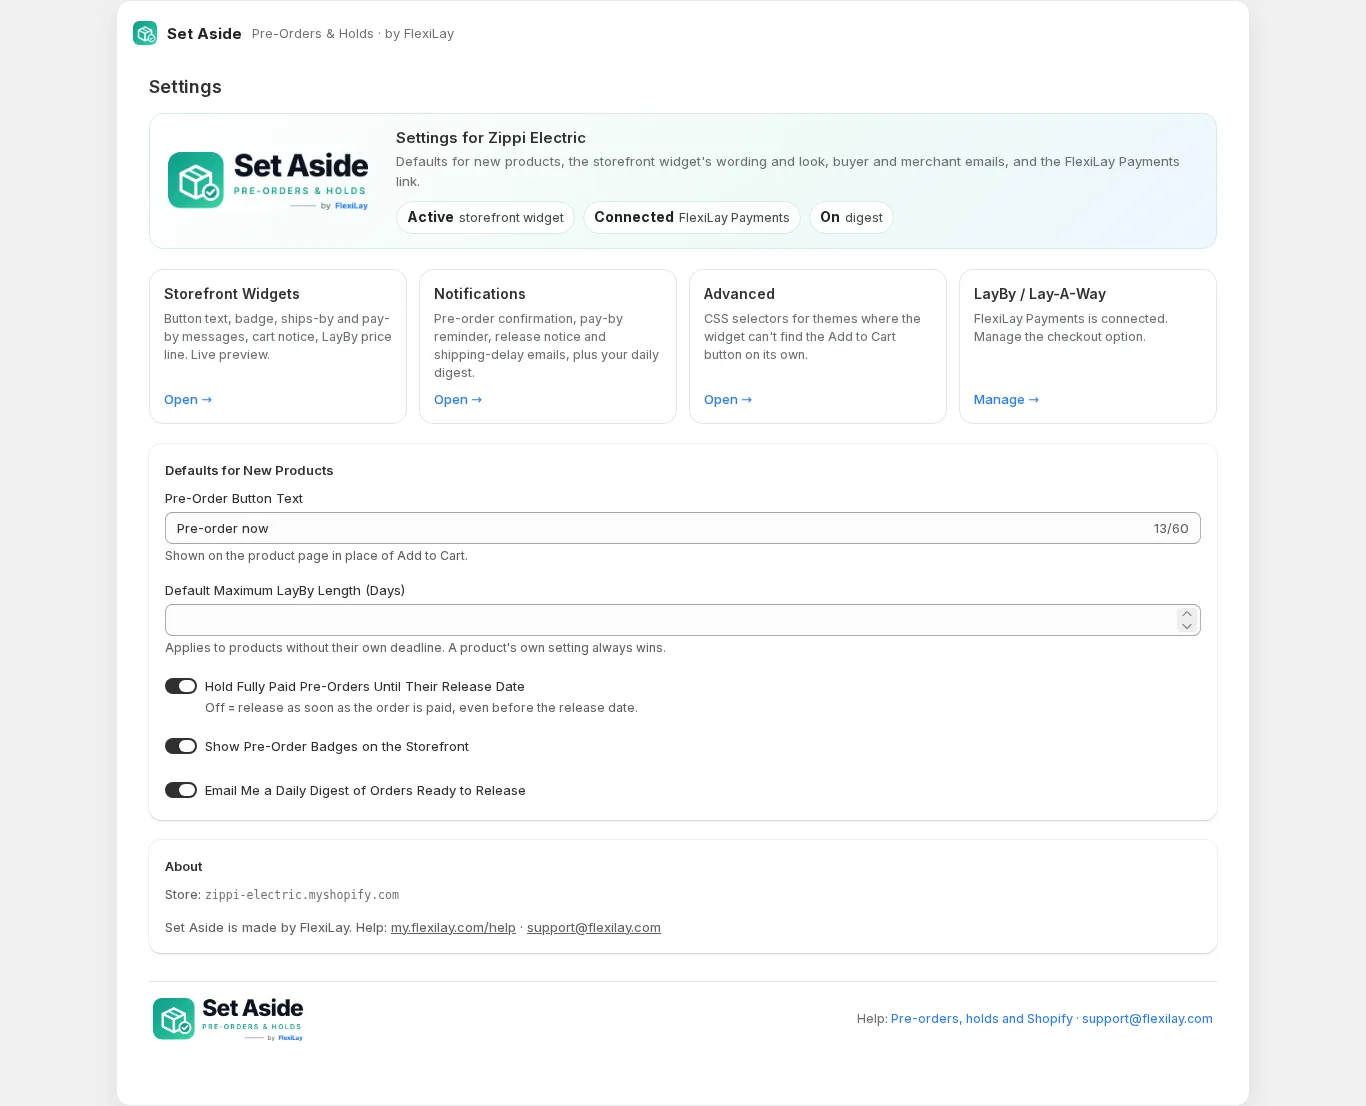
- Pre-Order Button Text — the default for new rules.
- Default Maximum LayBy Length — applies to products without their own setting, at checkout, on orders and on the storefront line.
- Hold Fully Paid Pre-Orders Until Their Release Date — on by default. Off releases paid orders at once, including any already held.
- Show Pre-Order Badges on the Storefront — the master switch for badges.
- Email Me a Daily Digest.
Troubleshooting
- “Storefront Widget Not Detected”. The app embed isn't on, or no product page has loaded since. Theme editor → App embeds → Set Aside → Save, then open a product page.
- The button still says Add to Cart. Custom button text applies to pre-orders only; deadline products keep the theme's button. If a pre-order shows the wrong text, check the rule is Active and the product page has reloaded (the storefront caches for a minute).
- Customers can't buy a pre-order. The rule is Paused, Scheduled, Ended or has reached its cap. Shopify also blocks a product with Requires selling plan when the widget isn't adding the selling-plan field: turn the app embed on.
- The product shows Sold Out. Keep Selling is off and stock is zero, or the cap is reached, or the release date passed with no stock in (the Overview warns you, and the digest lists it). Move the release date or receive the stock.
- A “Sync issue” badge on a row. Shopify refused a change (for example the product was deleted). Open the row's Re-sync; the badge names the step that failed.
- An order isn't held. It contains no product with an Active rule, or it was placed before the rule existed. Holds are placed at order creation only.
- Incoming shows “grant access”. Click the banner on the Overview or Pre-Orders to approve the inventory permission.
- The LayBy line doesn't show. It appears only once FlexiLay Payments is installed and ready, and the LayBy Line template is on.
Good to know
- Free. There's no plan, trial or usage charge for Set Aside.
- Emails to buyers are sent by FlexiLay in your store's name, with replies going to your contact email.
- Pausing or removing a rule never touches existing orders: their tags and holds stay until they're released.
- Uninstalling removes the app's access. Selling plans and holds it created stay on Shopify until you remove them; rules are kept for 48 hours in case you reinstall, then erased.
- FlexiLay Payments and Looked After: Returns & Claims are separate apps by the same team; Set Aside works with or without them.
Stuck? support@flexilay.com.